|
This tutorial was originally written by Allen McKay (June 2000). It was revised and modified with permission by Kenneth "Maxcraxx" Rodda (August 2001).
Assumptions:
1. You are Familiar with the 3D Studio Max Interface
2. You are Familiar with the 3D Studio Basics
If you are not familiar with the 3d Studio Max interface or the basics head on over to 3D Cafe and review some tutorials to familiarize yourself with the 3dstudio interface and basic techniques.
Introduction:
Modeling in general is a very hard task but a very rewarding one. Being able to make a decent model no matter what shape or form really sets you free from many restrictions. Learning the techniques involved in modeling is easy, but finding techniques that are powerful and gives you control you need to make your models can sometimes be quite hard.
I am writing this technique here on modeling with edit mesh in 3D Studio Max. I plan to cover all of the techniques and tricks required that will make your modeling steps a lot quicker and easier. Rather than calling one feature in edit mesh a technique and limiting your style to just that alone, expand your horizons and use all of edit mesh, since essentially that's what it's therefore.
Plenty of people I have met have sat down everyday and used one area of edit mesh over and over and over and never even thought about touching any other part of edit mesh, and then they get over protective about how others use their own technique which essentially is just another part of edit mesh, and brag that their technique is better. Neither are techniques!
They're small elements of edit mesh and only do specific things, such as build face creates polygons, dividing edges, extruding faces, extrudes, none are full blow modeling techniques, they're all just part of your tool set. Why just use a hammer to build a house when you can use a saw, a drill and other tools that will help get the job done less painfully?
By the time you finish reading this tutorial I'm sure you will have learned a lot about edit mesh and hopefully a lot of things you didn't know about it. This tutorial is teaching a modeling technique, not just a tool or two, but every trick and step within modeling with polygons for a real time renderer.
Keep in mind that the secret to success in 3dsmax and in life is not to be afraid to get into the guts of things, if you only ever skim the edges and assume there's a button to automatically create something for you you're absolutely wrong and of course you won't get too far.
You really need to get right into the guts of your model and your scene and not be afraid to tear it apart, delete half of it and rebuild it from scratch, tear pieces away and form new ones, rip it to shreds to look inside and see what makes it tick.
You need to be able to throw it away and make a new one from nothing if you wanted to, you can't just look around from a distance and hope it looks okay, this is especially true when it comes to real time models.
Picture this: You're looking for your keys you can't remember where you put them, could they have fallen out of your pocket when you were sitting down? or perhaps you put them in the fridge when you were putting away the shopping? Or left them in the door when you let yourself in?
By walking into a room, putting your hands on your hips and looking around to see if you could see them, it's more than likely you won't be able to find them. You need to run around rampant and tear things apart, throw cushions on the ground and open things, close things, push things aside so you can see where they are, otherwise you will never find them! And I'm sure you could relate this to fixing cars too, but that's another thing.
Rule #1 - Never be afraid to get into the guts of your model.
Let's Get Started:
Let's begin by setting up our scene for our model. One of the easiest ways of keeping your model organized is by using a template to keep your characters proportions correct. If you are a good artist you can sketch out the standard orthographic views of what you are trying to model, and scan the resulting image in. Otherwise you may have to search the internet for templates, below is a standard male template to use for this tutorial.
Now let's set up our views and get started. Select the Front view and go to Views, Viewport Background Image. You will get a window as shown below.

Click on files and find your image file. Now under aspect ratio we want to select Match bitmap so the bitmap doesn't stretch or change size and we want to check mark the Lock Zoom/Pan box so that we can zoom in and out on the image as well as pan back and forth without the image tiling or changing size.
On some machines zooming in too close will use a whole lot of memory and you will get a box saying how much memory it will use and if u want to display the image. My suggestion is to click no zoom back out and repeat the above process to show your image again, You will have less chance of crashing Max. Repeat the above step in the left view as well.
Now we are ready to start modeling. Go to the create panel and go to the primitives level and create a standard box. It doesn't matter what type of box we create or its size since essentially we are going to get rid of the box straight away. We just need an object of some kind so we can get to the edit mesh modifier in the modify panel.
Once you have created the box go to the modify panel and click on edit mesh. Now go to the sub object level and choose vertice. Select all four of the vertices and delete them so we are left with nothing.
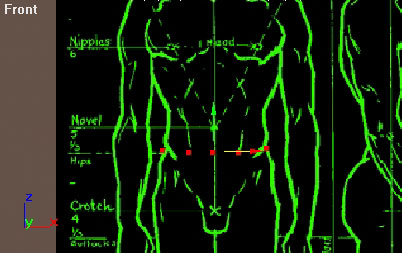
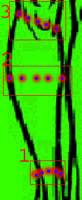
What we plan to do now is begin plotting vertices around the edges of the characters profile. Just in the essential places to build his shape. Essentially we must keep in mind that we want this character bend and deform correctly so placing the vertices at all the correct joints such as the knees, elbows, wrists, neck, chest, shoulder, hips and bikini line is essential.

The red shows the actual joints that are needed to deform the basic character. The neck, shoulders, elbows, wrists, chest, hips, bikini line, knee's and feet. The blue shows the extra segments which should be added so the knees and the elbows deform correctly. The reason they need extra segments is because otherwise when the arm bends, the bottom of the arm becomes flat. See below:

If you look above, there is no second segment to give the correct proportion in the elbow and give it boldness after it bends, so without a second segment the elbow sheers and becomes flat, which is very unrealistic. So in the knee and arms it is essential that they have two segments to allow the joints to deform correctly.
Learning your tools is vital to modeling, if you do not know what your tools are capable of you're likely not to be able to get the job done as well as you could. Some techniques can speed up time 100% when it comes to refining and shaping your model.
Most of your tools are found within the Edit mesh modifier. Edit mesh is one of the most powerful modeling modifiers you will probably come across to date, essentially edit mesh is an essential modifier which manipulates the form and appearance of a polygon object.
It has five sub levels within it, each doing it's own specific thing: Vertex, edge, face, polygon and element levels.
Vertex controls the vertex level, allowing you to manipulate the points on a polygonal object.
Face is face level, which lets you control and manipulate the triangular faces in the object.
Polygon is the same but modifies polygons so it is not limited to just triangle faces.
Element allows you to select and modify a chunk of faces connected together. Anyway polygons welded together or connected in anyway will be selected, but ones that are not welded or connected together will be left unselected since they are a separate 'element'.
Within each of these menu's is a large content of small tools which do individual procedures to your model. Here I am going to cover mainly the face, vertices and edge menu's. The others are important but for real time modeling they are not really needed.
Now back to our model. So far we have a box with no faces or vertices since they were all deleted. What we are going to do now is plot vertices around the background image in the front and side viewpoints, and build the polygons up.
If you look at the front and side images it shows the proportions of a male, we are going to use this for reference to build our character, having a background image of our character we want to model in side and front profiles helps use model the character more accurately. This means we can get the job done faster and also keep to the actual look and style that we wanted.
Open edit mesh and go to vertex level. Click on the create button and in the front viewpoint click on the bottom left of the leg, and then the right bottom leg. Then click on the middle of the leg, and then in between the left and leg vertices.
Do the same for center of the shin, and then below the knee. We are creating all the vertices for the leg right now, next we are going to build the faces. Go to face level and click on create click on the first vertex and then the one to the right, and then the one above it. Like below:
Continue to do this. The process is quite simple, first you are clicking on face level, then create. Then you click on the first vertex and in Counter Clockwise motion you click on two other vertices.
By connecting 3 points together it creates a face, or a polygon. This is how we create the faces for our object, remember to create them Counter Clockwise. The reason to create Counter Clockwise rather than clockwise is because the direction you click on the vertex's defines which side the face is created on, if you are going Counter clockwise it creates the face facing backwards (towards you) and if you create it clockwise it faces in the other direction.
Just to recap, we are creating the faces by clicking on a point and then another point, and then the last point, in a counter clockwise Direction although. Look below for a visual demonstration of the process.


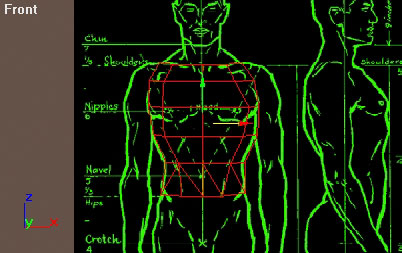
Essentially what needs to be covered is that you need to plot vertices all over the body and then build the faces for them, a simple rule for building the faces is you create one in the center, one to the side and one on the other side, and then one in-between both of them. Look below:


Once again, the way you build a face is click on create under the face menu, choose three vertices, in counter clockwise order. A neat trick here is that you can go to edge mode, select the top layer of edges and hold down shift and move the edges up to extrude them out. You can continue up and create most of the chest, and then move the vertices around to shape the chest better. This is a speedy process which can save great amount of time and allow you to continue on forming your creation.


Modeling the chest is rather easy, the secret is to model something at the detail you need trying to keep it neat and tidy, and if you have more polygons at the end, go back and refine areas and make them even more detailed.
With the back you can do the same thing, build the five vertices, build five above them, build the faces and extrude the edges up, or you can build more vertices and continue to build up the body.
Once you have built the back attach the front body and then click on build face and build the faces in-between the back and the front up, e.g.. stitch the sides together by building the faces up the body. or select two vertices and hit collapse to sew up the sides.
Leave the gap around the arm socket open, build around it but do not build faces over that. You should end up something like this:


Now since we do not want a square arm when we extrude out the arm, we'll want to add more vertices and curvature to the arm socket, we do this by going to the edge level and choosing divide.
Clicking on the direct middle of an edge to divide it, and then do the next edge and the next. What happens is where the edge is divided is a vertices is placed there, dividing that edge into two.
If you look below you can see the two red vertices and in the middle a blue one is created by dividing the edge.

Now whilst in edge mode select the edges, hold extrude and begin to clone/extrude the edges out to form the top of the arm, rotate them and continue to pull them out, try to keep it clean as you begin to form the actual arm.
Now after building the top of the arm we are going to build the bottom of the arm from faces rather than just extruding the arm out. So go back to vertices mode, and place one vertices at the left of the wrist, one at the right of the wrist and one in the middle, do it again for just below the elbow, and then do it again just above the elbow.
Once you have done that, grab the vertices and pull them out in the left viewpoint and form the actual shape of the arm. Now go to edge mode and now we want to add the extra segments to the arm so there's five vertices in the arm like with the upper arm. So go to cut which is located near the divide button.
Click on the edge in-between two vertices on the wrist, and then go up one segment and then one segment higher. Now do it for the other side of the forearm.
Now you may have noticed that cut cuts the segments in half like divide but does it neater and leaves the edge visible instead of making it invisible. Now grab the vertices that were created and pull them out slightly to give the forearm roundness.


Now what is left is to build the faces in-between the two faces, go to faces and build the faces counter clockwise to stitch the segments together.


Once you have done that rotate the view around to the back of the arm, go to edge mode and select the elbow face, extrude that down, extrude it again and then one more time, basically following the actual form and shape of the arm.
You may need to rotate some of the edges and reposition them so they fit correctly, once You have done that go to the vertices level and choose weld, target.
Target weld is a very powerful way of stitching vertices together. How it works is you drag vertices on top of each other, so now begin to stitch the arm together by dragging the vertices that need to be stitched on top of each other.


Continue to stitch the arm until it's all closed.


Now we are going to build the legs and the pelvis, starting at the shin we are going to work our way up to to the top.
Once again create three vertices at the bottom at the shin in the front view, build three more at the calf and three more at the knee, then three above the knee. Pull the vertices out in the left view to shape them correctly. Cut down the leg adding more segments by going to edge level and choosing cut, start at the bottom and go up to the top, do the other side too.
Now let's just say above the shin a bit we wanted to add one more segment, rather than cutting or dividing the edges we can use slice, slice makes a planar gizmo which is to be used to slice directly through an object creating a segment wherever it cuts.
Go to edge level and near cut there is the slice plane button, click on it, a yellow gizmo will become visible, now rotate it and position it to fit directly through the shin, click on slice.
Now a new segment appears, what we need to do now is go to vertices level and weld the vertices that remain, since there are edges that were divided that we do not need to divide such as the invisible edges, so lets weld them onto the ones we wish to use.


Select those new vertices and move them in the left viewpoint inward just a bit. Now we want to create the other side of the leg, the way we shall do this is by selecting the edges of the leg, just around the calf area, and cloning them out behind the leg, and then doing it again, move the edges in now and position them correctly, build the face at the back up to fill the gap between the two edges.
Extrude the back edges upward to create the rest of the leg and then weld those vertices to the leg. This should create two vertices on each side that need to be welded, rather than target welding, what we'll do is select the two vertices on one side, under the numerical type in box next to selected (just above target weld) type in 5000 and then click on selected. This welds the two vertices togeather directly in the middle of their position. do it again for the other side. Select the other two vertices, click selected. They're welded, well done.
Now extrude up the leg one more segment so we get up to the top of the leg. Now Keep in mind we have nine vertices for the leg segment, so we want to create nine for the leg socket for it to plug into.
Around the leg's bikini line, build those nine vertices around the socket. From here build the faces together and continue to extrude faces around to create the backside. So far your character should look something like below:

Now we shall go about modeling the feet of the model, zoom in the left viewpoint. Create a box and go to vertex level, select all the vertexes and delete them, begin to plot vertexes around the side profile of the foot in areas that are required so that the foot shall bend properly. Now it should look something like below. Now build the faces around the foot.


Move the points around in 3d, basically select the bottom two levels of vertexes and pull them out to the left, and begin to shape them like a foot. and then do the top one to fit that.
Basically once you have created all of those faces and move them out correctly, go to edge level and select the bottom of the foots edges, and extrude them down, now pull them to the left, and then raise them up, this is going to be the bottom of the foot.


Select the edge of the toe and extrude that out and pull that in, go to face level and build the faces around that. Now clone the foot and flip it horizontally and place it next to the other with a bit of space in-between the two. Attach them together. Build the faces together to stitch it together. attach it to the leg and weld the vertexes together to stitch the foot on.


Now we are going to build the hand, place 3 vertexes at the wrist, three more at the middle of the hand and three more at the end, then one outside of of the hand at each vertex and build the faces, pull the points out and then clone and flip the object, move it in attach it and position the hand correctly and build the faces together and stitch it.


Modeling the head is nearly exactly the same, plot the points around the head, and then build the faces, pull it out and clone and flip it, build the faces and Walla insta-head.
Now by attaching the head to the body and building the faces around the shoulders and welding the neck vertices to the body you should have completed your body.
Although I had planned to go into refining your model I will write a chapter on this when I get the chance, learning how to add detail and refine areas to make them perfect, as well as optimize and weld vertices down. Hope this tutorial taught someone a thing or two.
Forth-Coming Tutorials:
**Preparing the UVW Maps to fit your new skin on your new Model
**How to Weight and import Your new Model Into Rune
[ Click here for printable version ]
|