|
Vertex Editing is used by many mappers, but mostly newbies always used to ignore it and thus lose a great opportunity.
When using Vertex Editing, the mapper changes the basic form of a brush by moving its outer vertexes and thus creating a handier form. Here's how to use it:
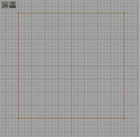
First you have to choose a brush. For our example, you should create a room with the masses 1024*1024*1024. All the following pictures are taken from the "Map XZ" View of the Editor, usually it's the upper right 2d-window. That's our training room, and it's bigger than the usual room size, but also easier to use for this demonstration. Subtract it.
(verted1.jpg)
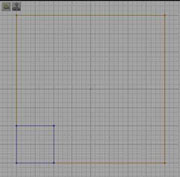
Okay, now make another brush, we'll take one with the which is 256*1024*256-sized. Move this brush to the lower left corner of the subtracted brush and add it.
(verted2.jpg)
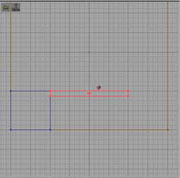
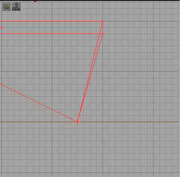
Our goal is to create a ramp which leads up to this brush. For that, we'll have to make another brush. Use a size of 32*256*512 here. Now move it straight to the edge of our added brush and your window should look like that:
(verted3.jpg)
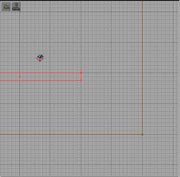
The red brush can have two looks. It can be dark red or bright red. We have to use it in it's bright red look. This can simply be reached by clicking on it one time. Now it gets "difficult".
Don't underestimate the next step. Click on one of the vertexes. We'll take the marked one:
(verted4.jpg)
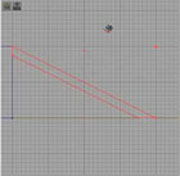
As we choose this vertex in the side-window, and will definately choose all it's "partners", too, it doesn't matter which one we get, the front or the rear one. Okay now, as we said above, just click on it and now hold down the ALT-key. Now move the vertex down to the marked raster-point.
(verted5.jpg)
Easy, isn't it? Do that with the other lower vertex. Now move the upper ones to an position 4 Units to the right of the other ones. You should get this view:

(verted6.jpg)
You may have noticed the relation of the length of the two sides of the brush, which is now exactely 1/2! The length of the vertical end is 2 units, the length of the horizontal end is 4 units. You have to get some practice by training these relations, though you won't get good trimtexture-alignment.
(verted7.jpg)
Okay, the last thing I want to show you is a picture of a room that has a lot of vertex-edited brushes in it:
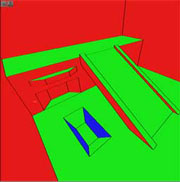
(verted8.jpg)
Test this thing. It's a useful companion on the rocky way to good level-editing!
"What are tesselated cubes?"
First, they are a damn cool tool, and as a matter of fact, you don't have this advantage in RuneEd. No, don't stop reading.
If you have Unreal Tournament installed on your computer, you can use the brush import/export options to get a tesselated cube into your RuneEd. Until now it's the only way, I hope this will be fixed soon.
Tesselated cubes are modified cubes. They are cut diagonal on each of their 6 sides. That means, you have 12 triangles. If you know the material (and have some 3dimensional knowledge), you should know that you can't deform or curve any sort of triangle. And that's why tesselated cubes are such a good option!
Did you ever try to use irregular vertex editing on a normal cube? Try it and you'll know what I mean!
So if you use irregular vertex editing, ALWAYS use tess cubes! What you can use them for? Let's see, the most important things you can make with tesselated cubes are natural rocks and ground. A triangle form looks more natural as an quadratic one.
[ Click here for printable version ]
|