|
NOTE FROM KAZI: This tutorial originally appeared on Lode's Tutorials. It's a great site, so head over there for updates.
Shadow Detail
The quality of the lightmaps on a surface depends on the Shadow detail you give it. Open the Surface Properties of the walls, floor and ceiling of a room and try these things. Always rebuild lighting after altering a propertie, to see the result:
* High Shadow Detail: The lighting on the wall will have a higher quality. Use this if you want for example the light through a window, fence, ... casted on the floor realisticly, as you can see on the screenshot.
* Low Shadow Detail: Lower quality, higher performance.
* If you check High ánd Low Shadow Detail, the wall will be Ultra Low Shadow Detail
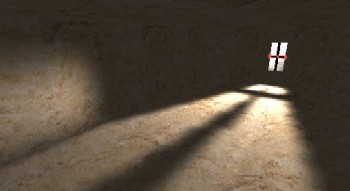
Set the surfaces to high shadow detail to get realistic light effects
TexturePaletteLoop
This is a cool feature of the Unreal engine, that not many people know: you can make the lights loop through different colors. To do this, open a light's Light Properties and set it's LightType to LT_TexturePaletteLoop. Now go to the texture browser and open the package GenFX.utx or Palettes.utx. In these packages are good palettetextures.

The gradients of GenFX

The palettes
Select one of the palettetextures, and then in the Light Properties, expand Display and click on Skin (the same thing you use to create a corona). Press the Use button.

Use a gradient or palette as Skin for the light
The light will loop only through the colors of the palette (in their order) from the texture you used. It ignores the texture itself. If you want to make a light that fades from red to green to blue to yellow back to red etc... and don't find a texture for this, you'll have to use a program like Paint Shop Pro or PhotoShop and make a new 256 color texture. To edit the palette in PSP7, open the menu Colors and there choose Edit Palette.... However, editing the palette is a long and boring job. There exist specialized programs to do this, but I don't know any names at this moment.
Now set the 3D view to RealTimePreview and DynamicLight modus and view the light changing color. If it isn't clear enough, try some other textures. To change the speed of the effect, use LightPeriod under Lighting. You can also use LightPhase and other settings to get the light exactly how you want it. However, the LightHue and LightSaturation settings are ignored.
You can use TexturePaletteLoop for example to create a fire: use a palettetexture with yellow, orange and red colors in it.
If you set bCorona to True, the palettetexture will also be used as coronatexture, because the same skin is used for corona and palette. This is ugly of course. If you want the TexturePaletteLight to have a corona, add a second light and set it's Brightnes to 0 (not it's LightRadius), give it a corona and place it on the same place as the TexturealetteLight.
If you have a discolight, with LE_Disco, it is very cool to combine it with LT_TexturePaletteLoop. As skin, use Candy from the Palette.utx package, because that is a real colorful one.
TexturePaletteOnce
TexturePaletteOnce makes the light go through the palette only once. It's used for the weapons, explosions, teleporters, spawnpoints, etc...: these cast a colored lighting effect that stays there only for a short time.
To get TexturePaletteOnce to work, there are three obstacles that you need to overcome:
* It must have a Skin (the same way as TexturePaletteLoop needs a skin) and LightType set to LT_TexturePaletteOnce
* You have to set 3 different Advanced Settings: LifeSpan, bStatic = False and bNoDelete = False.
* It must be spawned during gameplay
The last obstacle means you don't have to place your light in the level, but instead you need to place something that spawns the light. You can use a ThingFactory + SpawnPoint, but here I'll use a very simple spawnscript instead. Then you need to make a new Actor Class: that will be the light that has to be spawned: in this new Actor Class you have to set the Default Properties (it's in there that you have to set LightType to LT_TexturePaletteOnce etc...), because it's impossible to tell a ThingFactory or the spawnscript I use here to spawn an existing actor with modified (= non-default) properties. However, when it spawns the new class you make, the default properties of this class will be used and that is exactly what you want.
Let's start with the spawnscript. If you want to use the ThingFactory instead, go to here. The reason I use this Spawnscript is because it's so much more simple than the ThingFactory: all it does is spawning the actor you want at it's location, every time when it's triggered. The other reason is because the lights with TexturePaletteOnce were only called by scripts anyway (for example by the explosioneffects etc...). In the Actor Class Browser select KeyPoint, then open the menu "Class" --> New..., and in the window that appears make sure after the word "Parent" the word "KeyPoint" appears (if it doesn't, press cancel and select KeyPoint in the Actor Class Browser before making the new class. Of course, if you want it to expand another class, just select that class instead, but then your script will differ a bit from the one I enter below). Type as Package "MyLevel" (because it's ridicilous to bother the players of your map to put a new *.u file in theis system folder for such a small script), and type as Name "SpawnThing". Now in the Actor Class Browser, double click on the newly created SpawnThing, and the script window should appear. Simple enter the following script in it:
//================================================
// SpawnThing.
//================================================
class SpawnThing expands KeyPoint;
var() class SpawnedActor;
function trigger(actor Other, pawn EventInstigator)
{
Spawn(SpawnedActor);
}
Then in the script window open the menu Tools and press Compile Changed (do NOT press Compile All, unless you want to wait for a year).
Ok, now you have the SpawnThing, or you have a ThingFactory, now you need to make the new light class. In the Actor Class Browser select Light, then open the menu "Class" --> New..., and in the window that appears make sure after the word "Parent" the word "Light" appears. Type as Package "MyLevel", and type as Name "TPOnceLight" (or whatever other name you like to give it) and press Ok. Now select this newly created class in the Actor Class Browser, right click on it and open the Default Properties of the TPOnceLight (so DO NOT add this TPOnceLight in the level, just open it's Default Properties. In the Default Properties expand Advanced, set bNoDelete to False and bStatic to False. Then enter a LifeSpan: this is the time the light will live after it's spawned, and also the time it takes to loop through the palette. Once the light has gone through the palette ONE time, it's LifeSpan is finished and it disappears. Never leave LifeSpan at 0, or the light will die immidiatly (= useless!). For example if you enter 0.5, the light will finish the palette in 0.5 seconds.
After this, give it a Skin, as you did in the previous section: the palette of this skin determinates the colors the light will go through. Finally, set the LightType to LT_TexturePaletteOnce.
Now, the only thing that you have left to do is make the TPOnceLight get spawned when you want. First, select the SpawnThing you made in the Actor Class Browser, and add it in the level at the location where you want the TPOnceLight to get spawned. Then select the TPOnceLight in the Actor Class Browser, and open the properties of the SpawnThing in the level (NOT the default properties). In there expand SpawnThing, click on SpawnedActor and press the Use button. In the textfield, the name Class'MyLevel.TPOnceLight' should appear. Then in the properties of the SpawnThing --> Events --> Tag enter "TPOnceLightHere" (or any other Tag you want to give it).
Finally, you need a trigger or any other event to activate the SpawnThing. So add a trigger somewhere in your map, and in it's properties --> Events --> Event enter "Once" (this is the tag you gave the SpawnThing). You can of course also use any other event instead of the trigger, for example an event caused by a mover or whatever.
If you now walk in that trigger, it activates the SpawnThing. This SpawnThing then spawns the TPOnceLight at it's location. The TPOnceLight does his thing and then dies. Every time you activate the trigger again, a new TPOnceLight gets spawned, but of course all these new TPOnceLights will die after their LifeSpan so you don't have to fear an overload.
Go to the section Tubelights that Flicker On for something useful you can do with TexturePaletteOnce.
Making Any Object to Give Light
You don't need such a torch symbol to have lightsources in your map. Any object can be made to give light. For example chairs, trees, books, ... Open it's properties and you'll see that all the objects have a Lighting and a LightColor expansion. Sometimes you'll have to change a lot of properties before the object gives light, for example because it's lighttype is set to LT_None or it's LightColor or LightRadius are set to 0. There is however a minor problem with this: if you add for example a light to a shieltbelt, and someone takes the shieltbelt away, the light will still be there.
You can really set any object to give light, even brushes! However, if you set a brush to give light, this will only be visible in the editor, in UT the brushes are removed so also their lighting is deleted.
Adding Sound to a Light
You can also add an AmbientSound to a light. The cool thing about it is that if you use a LightType such as LT_Strobe, LT_Pulse, LT_Flicker, ..., the sound will Strobe, Pulse, Flicker, ... as well. Very useful for a broken tubelight! First open the Sound Browser (in menu View, for UEd1 it's in the same window as where the Texture, Class and Musidbrowser are). Open the soundpackage Extro.uax and select Light6.
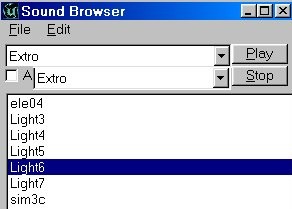
The Sound Browser
In the Light Properties expand Sound. Click on AmbientSound and press the Usebutton. In the 3D view set RealTimePreview on and listen to the sound. Now set the LightType to LT_Pulse, and you'll here the sound fade away and fade back in, together with the light. Now set LightType to LT_Flicker, and hear the sound flickering as well.
You can also change Pitch, Volume and Radius of the sound, by using SoundPitch, SoundRadius and SoundVolume.

Lights in Actor Class Browser
In the actor class browser, you can find more lights than just the standard one you used until now. Open the Actor Class Browser (it's in the View menu of UEd2) and expand Light.

The Actor Class Browser with a list of all lightclasses
Most of these lights are just normal lights with some activated properties, like LightType or LightColor.
* Light: this is the standard light that you used until now.
* ChargeLight: If you look in it's ChargeLight Properties, you'll see that it has a LightBrightness of 3 and a LightRadius of 3. And it's color is orange. Because of it's small brightness and radius, it's almost impossible to see the light.
* DistanceLightning: In the editor, it just flickers, but in the game it will flicker only every 30 seconds or so, so this is very usefull for lightnigs and special weather effects. I'll handle this further in the tutorial.
* FlashLightBeam: A yellow lightbeam, this light is used by the FlashLight in the game.
* OverHeatLight: Doesn't give any light at all.
* QueenTeleportLight: It's red and pulses, however it doesn't in UT because it has a LifeSpan and requires to be spawned during gameplay.
* SightLight: It's green and has a small radius, but doesn't work in the game.
* SpotLight: A spotlight, doesn't work in the game.
* TorchFlame: see the section TorchFlame for this
* TriggerLight: see the section TriggerLight for this
* TriggerLight: see the section TriggerLight for this
* TriggerLightRad: This doesn't work. If you right click on it and choose Edit Script, you'll see the comment "Broken.", as well as "Hi Andrew!".
* WeaponLight: This is spawned by some weapons, and has got LT_TexturePaletteOnce.
* EffectLight: same as weaponlight, but uses a blue texture.
* PurpleLight: again the same, but (believe it or not) purple.
Only DistanceLightning, TorchFlame and TriggerLight are useful. The others are broken, or only work if they are spawned during gameplay.
TorchFlame
See in the section above and select the TorchFlame. Place one in a room.

A TorchFlame
It's a nice flame that gives light as well. There are a lot of properties that you can change for this flame: open it's TorchFlame Properties and expand Display.
* Use DrawScale to change the size of the flame
* Use Fatness to change it's fatness.
* Use ScaleGlow to change it's translucenty.
* Use DrawType to change how the light is drawn: now, it is DT_Mesh because the flametexture is a mesh. Normal lights use DT_Sprite for their 2D torch symbol.
* Use Mesh to change the mesh: open Mesh Browser or click on the 3 dots next to the Use Button and you'll see the mesh browser. However there's only one flame mesh. In the mesh browser's 3D view, use left mousebutton to zoom and right mousebutton to rotate. Press the play button to play the movements of for example this nice Titan. Choose any mesh you want and press the Usebutton. But there is only one torch mesh, so except if you make a torch mesh yourself, this is not really useful.

The Mesh Browser
LightSources
To make your map realistic, it's best that you always make lightsources for the lights. I mean, if you place a light in a building, place for example tubelights in it. You can creating lightsources yourself by using brushes. But there are also lots of nice lightsources in the Actor Class Browser. Under Decoration: Candle, Candle2, Lamp1, Lamp4, Lantern, Lantern2, InterpolatingObject and under Decoration --> ut_Decoration (an expansion of Decoration): TubeLight and TubeLight2
In their properties, you can change their size etc..., look in the section LightBoxes of this tutorial for this.

Some of the LightSource Decorations
LightBoxes
You can give the lightsources a lightbox.

LightBoxes in CTF-Coret
The lightboxes are also an actor class. In the actor class browser, there is one under Decoration: LightCone, and there is one under Decoration --> ut_Decoration: LightBox
Open the LightBox Properties, and go to Display
* Use DrawScale and Fatness to change the size of the lightboxes.
* Use Style to make it normal, masked, translucent or modulated. Translucent is (of course) the standard setting. Modulated looks cool, but not useful.
* Use ScaleGlow to change it's translucenty.
You can of course choose another mesh by using Mesh.
TriggerLights
For this section I assume that you know something about triggers, if you don't please read a tutorial about it.
To make a triggerlight that will toggle between on and off each time you touch the trigger, do the following: In the Actor Browser, expand Triggers and there select Trigger. Place it in your map on the place you want to be the switch of the light. Now, expand Lights in the actor class browser and there select TriggerLight. (There might be two TriggerLights in the list, but they are the same). Now place it in your map.
Open the Trigger Properties ot the trigger and expand Events and type a name in Event, For example NiceLittleLight. Now open the TriggerLight Properties and there exand Events as well, and under Tag type the name you typed in the Event of the trigger, in my example NiceLittleLight. In triggerlight properties expand Object and set InitialState to TriggerToggle.
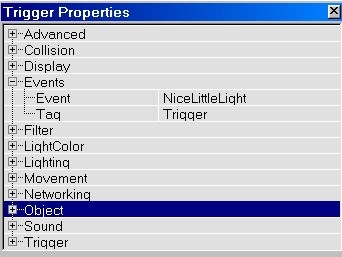
Trigger Properties

TriggerLight Properties
You now have a working TriggerLight. You can use these properties, in the TriggerLight Properties:
* bInitiallyOn: If true, the light is on when you start the map. For example if you have a TriggerToggle-light, it will be first on, and when you hit the trigger: off, etc..., but when this is false, it will be first off, then on etc.
* ChangeTime: how long it takes to switch the light from one status to another. If the light is off, and you hit a trigger that turns it on, the light will fade from off to on in x seconds where x is the ChangeTime value. If it's at it's default value of zero, the light will not fade but will go immediatly on.
* RemainOnTime: I have never seen this working.
* bDelayFullOn: if this is true, and you have a changetime larger than zero, the light will not fade but wait for x seconds and then go on or off.
In Object you can change the InitialState of the light:
* TriggerToggle: each time you hit the trigger, the light toggles between on and off. This is the one used in the above example.
* TriggerTurnsOn/Off: Light will stay On/Off forever after touching the trigger. If you use TriggerTurnsOff don't forget to set bInitiallyOn to TRUE, otherwise you'll have a light that's always off.
* TriggerControl: As long as you're inside the trigger's radius, the light is on, when you're outside of it, the light is off.
* TriggerPound: This doesn't do anything useful for a light. TriggerPound is used for movers, but appearantly also was left in the TriggerLightProperties.
Tubelights that Flicker On
When a tubelight gets a little older, and you switch it on, it'll first flicker a few times before it's on. Using TexturePaletteOnce, you can make this effect in the game: first read the TexturePaletteOnce section if you didn't already. Now, make a new light class called "FlickeringTubeLight". Make a Skin for it: in PSP of PhotoShop or any other painting program that can edit palettes, make a palette like this:

With this palette, the light will first flicker a few times, and then at the end of this palette, it dies and so there should be no more light, but you're going to make a TriggerLight to go on at this moment.
Save this as a *.pcx file and import the texture into UnrealEd, and give it to Skin in Display in the FlickeringTubeLight's Default Properties. Don't forget to set bStatic = bNoDelete = False. Set LifeSpan to the time you want the tubelight to flicker, for example 2, and remember this value.
Now, add the SpawnThing at the location of the tubelight, set it's SpawnedActor to the FlickeringTubeLight, and it's Tag to for example TubeLightFlicker. Then, also add a TriggerLight at the same location as the SpawnThing, set it's Tag to TubeLightOn. Set the InitialState of the TriggerLight to TriggerTurnsOn. Now add a trigger with Event TubeLight, then add a Dispatcher with Tag TubeLight, and in Dispatcher --> OutDelays set [0] to 0 and [1] to the LifeSpan of the FlickeringTubeLight, in this example 2. Then in OutEvents set [0] to TubeLightFlicker, and [1] to TubeLightOn.
When you now activate the trigger, the Dispatcher makes the SpawnThing to spawn the TubeLightFlicker, that dies after 2 seconds, but exactly at that moment the Dispatcher activates the TriggerLight, so the tubelight is on and will never flicker anymore.
If you want to set the InitialState of the TriggerLight to TriggerToggle, then when you press the trigger again the TubeLight will go out only after 2 seconds, and before it goes out the TubeLightFlicker gets spawned another time. Possible solutions are: script something, or use a different trigger for turning the TubeLight on or off, the trigger to turn on with the same Dispatcher as described above, the other trigger with as Event TubeLightOn. You only have to make sure the player can NOT press the same trigger again without pressing the other trigger first.
Movers & Lighting
The following few sections require you to know something about movers. There's a tutorial on movers here.
Movers have several properties that have to do with lighting: expand Mover in the Mover Properties.
* bDynamicLightMover: If true, the lighting will be calculated for every place where the mover will be, so if it's first in a dark room and goes to a bright one, the mover will become bright as well.
* BrushRaytraceKey: If the mover isn't a dynamiclightmover, the lighting on the brush will be calculated for this Mover Keyframe only.
* WorldRaytraceKey: If the mover isn't a dynamiclightmover, the lighting around the mover (for example shadow of it) will be calculated for this Mover Keyframe only.
Fake Shadows
An example of the effect of WorldRaytraceKey is shown on these screenshots. The mover is a lift with two keyframes: Key0 is down, and Key1 is up. Of course this only works when bDynamicLightMover is False

WorldRaytraceKey = 0

WorldRaytraceKey = 1
The second shadow is calculated as if the mover was at its up position. You can also use this to create fake shadows.
Moving Lights
The Unreal engine supports moving lights: for example if you shoot a rocket, you see a shine of the light on the floor, ceiling and walls moving as well. Also the Flashlight and the Searchlight are moving lights, because you can walk around with them. However, there is no Moving Light class in UT that you can program to follow a certain path. The only way to make such a light, is to attach a normal light to a mover!
Most objects in UT don't give much difficulties to attach to a mover. To attach an object to a mover, you need to use an AttachMover instead of a regular mover. To get an AttachMover in UEd2, right click on the Add Mover button, and in the list that appears choose AttachMover. In the AttachMover's properties, open AttachMover and give an AttachTag. Now, open the properties of the object you want to add, and expand Events. In there, set the Tag to the AttachTag of the AttachMover.

Give the attachmover an AttachTag...

...and give the moving object the same Tag
You can also connect objects to movers that are not AttachMovers, for example normal movers, GradualMovers or LoopMovers. To do this, open the Movement tab of the object and give it an AttachTag, and set the Tag under Events of the Mover to the AttachTag of the object. This means using this technique, you give the object and AttachTag and the mover a normal Tag, while using the AttachMover technique, you give the mover an AttachTag and the object a normal Tag.

Give the object an AttachTag...

...and give the mover the same Tag
So this way works for most objects, but not for lights. Before the light will be able to move, you have to change some more settings: open the Light Properties and expand Advanced. In there change the following settings:
* set bMovable to True
* set bStatic to False
* set bNoDelete to False

Change these three settings before the light can move
This is not only for lights, for each object you have to make sure bMovable is True and bStatic is False. Most objects have these settings like this already. These settings are self-explanatory: if bStatic is True, the object is a static object that will remain fixed on his position for ever. If bMovable is False, the object will not be able to move. So basicly these two settings do the same, the only difference is that the True of bMovable is equivalent to the False of bStatic, and vice versa.
The bNoDelete setting is a little more difficult.
* If bNoDelete is True, the light is a static light that will be ray traced by the editor, and lightmaps will be created on the walls. This gives realistic lighting and shadows, but needs a lot of calculation time. The main reason you have to Rebuild lighting with the editor, is to calculate all these things and store it in the map data, so it doesn't have to be calculated when you play the map in UT. Realtime radiosity is not (yet) possible because the computers are still too slow. Moving lights require realtime calculation so they cannot use radiosity.
* If bNoDelete is False, a much simpeler lighting algorithm is used, that can be calculated realtime while you play the map. This can be used for moving lights, however it is much uglier.

A light with bNodelete to True casts realistic shadows on High Shadow Detail walls.

The same light and walls, but with bNoDelete to False: a much uglier lighting algorithm.
If you have a moving light, but set bNoDelete to True, you get a really weird effect: the Unreal engine cannot calculate the moving shine of the light, so it uses a simple solution: only when the light is at it's begin position you see the light, and when it moves, the shine of the light on the wall disappears. With bNoDelete to False, you will see the lightshine does not disappear, but moves together with the mover.
Another detail about bNoDelete is that if bNoDelete is True (it's default value), the WorldRayTraceKey and BrusRayTraceKey of movers work proporly, but if it's False, these are just ignored. However that doesn't matter, as the light will move together with the mover anyway.
You can use moving lights for example to attach to vehicles, spaceships, trains or other moving things. But when you want a light to move on it's own, without vehicle or train, you can't do this without creating a mover. Then just place the mover outside the map, the light will still move together with the mover, no matter how far it's away from it.
Also, if you want the light to move forever, and not only when you hit a mover, you have to use for example a LoopMover, look herefor more details about this.
Moving Coronas
LightEffects like LE_Disco and LE_Rotor, and LightTypes like LT_Pulse etc... work with moving lights, even when bNoDelete is False. Also Fog works when the light is a moving light, try it out because moving fog looks great! You can use this for example for realistic foggy clouds moving around.
However, Coronas give some problems! First of all, when you add a corona to a light with bNoDelete to False, and rebuild lighting, the corona will not appear. There is a way to get around this! To do this, first set bNoDelete of that light to True and rebuild your whole map. Because bNoDelete was True, the corona is there and everything is just fine. However after that, set bNoDelete to False and do not rebuild anymore, but just save your map. The corona will remain there and also work in the game. You will have to do this every time you want to play the map, and the most important moment to do it is just before you release your map. You don't have to do all this if you use seperate lights for the corona and the shine: the coronalight does not have to be bNoDelete = False, because you don't need it's shine and set it's LightBrightness to 0.(see also a little further)
This was only the first problem. The second problem is a lack of support from the Unreal engine. Coronas work like this: there is a certain radius, determinated by the LightRadius setting. Only if you are inside that radius, you see the corona. Now here is the problem: this Corona Radius does not move together with the light! This means, if you have a light that moves together with it's corona, you can see the corona as long as you stand in the beginposition of the light, even if the light is 25 kilometers away. But when you move together with the light, you move away from the center of the CoronaRadius that stays on the beginposition, and you will not see the corona anymore, even if you stand on the same place as the light's current position.
What is the solution for this? Use a seperate light for the corona and the shine, and give the light with corona a LightBrightness of 0 but a huge radius. Set the radius of the other light to a normal radius, and give it no corona. (You can also read this at the end of the Corona section). The radius of the corona is most of the times big enough to work for very large distances. An advantage of this technique is that you don't have to set the bNoDelete of the coronalight to False, so you don't have to solve the first problem.
There's a working moving corona in the example map.
Scale Lights
In the Tools menu, there's a tool called Scale Lights.

Select one light and open it's Light Properties, expand LightColor (you don't have to do this, but do it now so you can see the value changing). Now open Scale Lights... in the menu Tools. Enter a Literal Value of 100. Make sure you can see the LightBrightness in the light properties. Press OK in the scale lights window and look at the LightBrightness changing. Every time you press Ok, it changes: it becomes 100 brighterer exept if it will become more than 255: then it will be dark again.
If you enter a Percentage of 100, the LightBrightness is multiplied by 2 every time you press OK. If it's 50, it will be multiplied by 1.5, if it's 20, by 1.2, etc...
You can also enter negative values, to make the lights darker.
The advantage of this tool is that, if you select 2 or more lights, and use the tool, the lightbrightnesses are calculated independent for each light. So if one of the lights had a brightness of 50 and the other one of 80, and you entered a literal value of 20, the first light will become 70 and the second one 100.
This tool might be useful if you have a room with lights with different lightbrightness and you want to make them all a little bit brighter. Just select them all and use the tool.
Light through Solids
Light doesn't go through solid or semisolid walls in the Unreal Engine (duh). But it also doesn't go through translucent or masked walls. It only goes through non-solids, but then you can walk through the wall or window or fence or whatever. If you want light to go through a solid or a semisolid wall, there is a complicated way to do that:
If you have for example windows with glass in them and want the light from outside (for example lightnings) to go through it, make the glass a mover, set it's key0 to it's normal place in the window and key1 on a place far away from it. Set WorldRayTraceKey to 1 and set it's InitialState to TriggerToggle and enter a unique tag for the brush. Do not create a trigger for it. This way, the mover will never move. Now, rebuild lighting: the light will be calculated as if the window is on that other place far away, so the light WILL go through the window.
Light through Non-Solids
Light goes through non-solid walls, but the only problem is that you can walk through these walls. However, sometimes you have a situation in which it doesn't matter that you can walk through them. For example if you create lanterns. To do this, make a brush that looks like a lantern and place it at the right location, open the Brush menu, choose Add Special... In the window that appears, set Prefabs to Regular Brush and set Solidity to Non-Solid. Then press Ok.

The Add Special Brush window
Now, add a light and place it inside the non-solid lantern. Rebuild geometry and lighting, and you'll see that the lantern gives light. If it was solid or semisolid, the lantern would not have given light.
A nice thing is that you can also see the corona of the light, if it has one.

The map DM-Gothic uses non-solid lanterns.
Searchlight, Flashlight and Flare
In the Actor Class Browser --> Inventory --> Pickup, you'll find Flashlight and Searchlight. These are the old ones from Unreal 1.
If you place them in an UT map, and a player picks them up, they work! This can add a lot of value to maps, it's really cool in dark caves etc...
The SearchLight shines better and has longer battery power than the flashlight.

The SearchLight and the FlashLight.
Translucent Surfaces
If you have a translucent wall, you can make it more/less translucent by giving it much/little light. Use special lit if you don't want the enviromnent to be affected by this. A translucent surface that is not illuminated at all, will be invisible.
The same counts for Modulated textures, only they will become black if they are not illuminated at all.

Every time the same texture, getting less translucent when it receives more light.
Coronas in a Skybox
If you place coronas in the skybox, you can not see them in the game. Th UT engine just doesn't support that. The best way to get a fake corona in the skybox, is to make the light a 2D sprite (go to section Sprites for this), and set Style in Display to STY_Translucent. In the map, you can't see that it is a fake, because you are not able to move closer or further away from it.
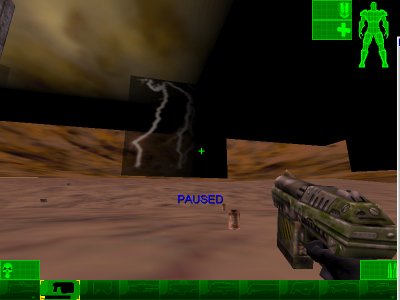
Lightnings
In the Actor Class Browser choose Light --> DistanceLightning. This is a light that flashes about every 30 seconds, like a real lightning. If you want lightnings in your map, use these.
Always place them in the skybox, so the clouds get the effect of the lightning, but you also have to place some in the map itself to enlight that as well. You can create cool effects with lightnings through windows, if you set floor and walls to High Shadow Detail.
ThunderLightning
For this section, I assume that you know something about scripting, if you don't know anything about it you can destroy your UT if using it wrong.
Lightnings never appear without thunder. There are a lot of ways to create thunder, in the first place by adding a Sound actor, however it will make the thundersound every second and that is too often.
Many people have found a way around this with scripts or trigger systems. I tried this as well: I made a new actor called ThunderLightning. It is a the lightning and the sound together in one actor. Actually I copied the DistanceLightning's script and just added a few lines in it.
To get a ThunderLightning yourself, do the following:
First open the actor class browser and select Light. Then in the menu Class choose New.... The New Class window appears. First of all make sure that the Parent is Light. Use a packagename that does not exist already, or you'll destroy that package of your UT. The best Package name to use is MyLevel, because this way you don't have to create a seperate *.u file together with your map. However, if you want to use the class in multiple maps without making this script every time again, choose another name. As Name use for example ThunderLightning.

The New Class window
Right click on the new class and choose Edit Script, you now see the Script Editor.

The Script Editor
Enter the following script:
//================================================
// ThunderLightning.
// Edited version of DistanceLightning, by Lode Vandevenne
//================================================
class ThunderLightning expands Light;
function BeginPlay()
{
SetTimer(5+FRand()*10,False);
LightType = LT_None;
}
function Timer()
{
if (LightType == LT_Flicker)
{
LightType = LT_None;
SetTimer(9+FRand()*20,False);
}
else
{
LightType = LT_Flicker;
PlaySound(Sound'AmbOutside.OneShot.thund1', ,255.0, ,6400.0);
SetTimer(0.8+FRand()*0.5,False);
}
}
After this, change the following default properties of your new class. Right click on the class and choose default properties.
* set bStatic to False in Advanced
* give it a LightBrightness and LightRadius of 255. You can make the radius seem larger if you use LE_Cylinder
* set LightType to LT_Flicker
Compile you script: in the Script Editor's menu Tools choose Compile Changed. Before you compile, make sure you have loaded the soundpackage (in this case AmbOutside) that contains the thundersound, or the compiler will give an error.
If you gave another package name than MyLevel, you have to save your package as a *.u file. In the menu view of the Actor Class Browser select Show Packages, and in there select your newly created package (not any other one, or you'll destroy UT) and in File of the Actor Class Browser choose Save Selected Packages.
If you distribute your map, don't forget to include the new *.u file you created in the system folder (of course not necaissary if you used MyLevel.)
You can also have it to make another sound, open the sound browser and in there open AmbOutside. There in OneShot are Lightn and Thunder sounds. To know what you have to enter in the script, create a light and set it's AmbSound to this. You'll then see the name of it. Copy that name, and enter it in the pre-last line of the script, between the ' '.After that, remove the light again.
When this actor is ready, it's very simple to make a map with lots of lightnings and thunders by just placing ThunderLightnings everywhere in your map!
This is only one way to make lightnings and thunders. You can also do this by using a combination of stochastic triggers, distance lightnings, triggered lights and triggered sounds. There's a great tutorial on storms, lightnings and thunders by Darendash here and here.
Visible Lightnings
Adding visible lightnings to the skybox gives really cool effects.

Lightnings in the skybox
To make them, you will need to import a masked lightning texture first.
Make a skybox in your map, and add some vertical sheet brushes in it, and give them the lightningtexture. Now, you want the lightningtexture to be visible only at the moment the lightning strikes. At all other moments, they must be invisible. To do this, do the following:
* Open the surface properties of the lightning
* Set the surface to Translucent, and also to Special Lit
* Now add one or more DistanceLightning actors close to it (It's in the Actor Class Browser --> Light --> DistanceLightning)
* Open the properties of the DistaceLightning and expand Lighting
* In there, set bSpecialLit to True and also give it a smaller radius.
Also make sure that there is no ZoneLighting in the SkyBox, and there are no other special lit lights.
This way, the lightningtextures will not be illuminated by any other lights than the DistanceLightnings, so as long as the DistanceLightning does not strike, the lightningtextures don't get illuminated and will be invisible.
There is one small problem with this: if you want the clouds of the sky be illuminated at all time, you cannot set it to Special Lit, but this way it will not get illuminated by the lightnings! The solution for this is to add a large horizontal sheet brush very close to the clouds, give it the same texture as the clouds, and set it's surface properties to the same as the lightningtextures. This way, you have a new layer of clouds that looks exactly the same as the original clouds, and will be visible only when it gets illuminated by the DistanceLightnings.
One thing: these lightnings will look horrible if MultiTexture is disabled in the Direct3D settings (read more about these settings in the section Fog)
These screenshots show the difference between MultiTexture disabled and enabled. Make sure you enable it!
MultiTexture disabled

MultiTexture enabled
Is My Map Too Dark?
Sometimes it's very difficult to know when your whole map is too dark or too bright. The ligthing of your map can add a lot to the atmosphere, so some maps need to be brighter or darker according to their theme. However, making a map TOO dark can ruin a good map. You can never be sure if your map is too dark or not, because every player has his own monitor settings, gamma setting (press F11 in the game to make the gamma brigher or darker), etc..., so a map that looks bright/dark on your pc might look very dark/bright on someone else's pc.
What you can do is, first of all look at the official maps included by Epic. These have a correct global lighting. Just pick a map that has about the same atmosphere/theme as your map, remember the global lighting of that map and try to put that into your map by altering the ZoneLight a bit, or making all the lights brighter or darker.
Also let some other people betatest your map and ask them if they find it too dark or too bright.
Lighting Tips
* Together with texture aligning, correct lighting is one the elements that are difference between a professional looking and a bad looking map!
* Do not exaggerate using special light effects, flashy colors etc... Dynamic lights slow down computers and too many colored lights (with saturation = 0) can make people nuts.
* Use LightSources! Place lights, lanterns, tubelights, etc..., in your rooms, this adds a lot of realism to the map. The light must come from somewhere!
* Use coronas: they look really nice, and make your lightsources even more realistic.
* Don't make your map too bright or too dark. Add variation in your map: a dark corner in a bright room, a sunny outdoor area with a dark cave, etc...
* If you are using multiple lights for something identical, for example a room with 24 tubelights in it, you can place these lights in a unique group (it's in the object properties of the light). If you want to change something for all the tubelights at the same time, it's much easier to select all these lights at the same time by making only their group visible. Use the group browser then to manage your groups.
* A map isn't professional or cool because it has a lot of weird lighteffects or colors in it. A lot of moving stuff and colors can make people nuts while playing the map. Keep the effects subtle!
The Example Map

A screenshot of the example map. With multiple rooms visible, and that's what makes the screenshot so ugly.
I've included a large example map in this tutorial, called DM-LightingDemo.unr. It's included in the zipped version of this tutorial. If you open it in UT, make sure there are no bots, they are really annoying! Also make sure Volumetric Lighting and ScreenFlashes are enabled.
Here's a description:
Once you are in the map, you are in a large outdoor environment, with a storm. You will hear thundersounds, because I added some ThunderLightning classes in there, and if you wait a little bit you will see lightnings in the sky. In front of you is a large building, the entrance is indicated by two green lights.
If you enter the building, you are in a large dark room. A trigger will activate all TriggerLights on the ceiling, making it very bright.
The next room is a dark room, with a green strobing blacklight in it. That's why the Nali's and the trees are strobing like that.
After that, you enter a small corridor with a broken tubelight in it. If you listen you will hear the flickering sound of it.
At the end of the corridor is a foggy room, and after that there is a room with moving lights in it. Some of the moving lights have Volumatric Lighting, so it looks like a moving cloud. There's also a moving corona.
Walk on the stairs, and enter the next room. There is a window with light shining through it, casting a nice shadow on the floor and the walls. If you wait a few seconds, you will also see the lightnings through it.
Walk on some stairs again, and you enter a room with lava in it. The lava looks so bright because it's surface propertie in Unlit, and there's a light with a fireeffect.
The next room shows an example of the use of special lit: some of the walls are illuminated by a blue light, the others by a red light. After that you enter a discobar, with a discolight in it, that changes color because it's LightType is TexturePaletteLoop and it has a colorful candy skin.
There is a door in this disco room, and if you go through it you enter a room that looks exactly the same as the castles of the old game Wolfenstein3D. It even has 2D objects in it, just like that old game had, and there's no lighting at all: everything is Unlit. There is a lift. To make the lift go up, stand close to it's wall with switch. To make it descend, move away from the switch.
Once you are up, you enter a room with some rotating coronas in it, and there is a fire.
In the next room you see green rings on the wall, created by lights with LightEffect LE_Shell, but if you enter the room, your screen suddenly turns blue. That's because there is a Zone with ZoneFog in the room.
After that you see a room with lightboxes.
If you go up the stairs you enter a green room, and on the right you see a dark corridor. There's also a FlashLight on the floor. If you pick it up, you can use it to walk in the dark corridor.
Once you are out of the corridor again, use the stairs to go to the next room, with a lot of translucent windows in it. The first one are hardly visible, while the last one is almost completely opaque. This is because the first ones almost don't get any light, while the last ones have a really bright light next to them.
As a bonus, you now can use the stairs to go to the roof of the building, and then jump off the building.
Please contact me if you have any suggestions, questions, problems, or whatever: email it to lode@altern.org
[ Click here for printable version ]
|