|
NOTE FROM KAZI: This tutorial originally appeared on Lode's Tutorials. It's a great site, so head over there for updates.
Things you like to know
Many people wonder about these things but never tried it:
- Movers can go through walls. However the players standing on the movers cannot. Movers also work if you let them start in a wall, and if you place a mover completely away from your map, somewhere in the dark blackness, it will still move, although you can't see it. That will be useful if you are attaching things to a hidden mover.
- Movers work underwater. But you need to be aware that when a player stands on the mover, and the mover goes down, the player will stay floating on the water. The solution is to give the mover a roof and walls.
- When you save your map with movers without rebuilding, and reopen it later, all movers might disappear. At least, this happened to me once.
Rotating movers
You don't need any special mover class to make a mover that keeps rotating around its own axis forever. Any object, decoration, weapon, mover, etc... can be made to rotate, they all use the same propertie for it.
Make a mover. You don't have to give it any keys. Open its properties and expand "Movement". In there, expand "RotationRate". You now see three values: Pitch, Roll and Yaw. As long as you leave them 0, the mover will not rotate. Small values, like 1, 10 or 100 make it rotate very slowly, so you can hardly see the rotation. A value of 1000 makes it rotate quite slowly, and values of around 2000 - 10000 make it rotate faster. You can also make it rotate as fast as you want, for example if you give it a value of 100000, but at this high speed you might see strange effects when stepping on the mover.
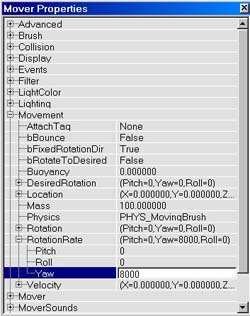
The RotationRate of a mover
Use Pitch to make the mover rotate around its X-axis, Roll to make it rotate around its Y-axis and Yaw to make it rotate around its Z-axis. This means, if you want to make a rotating platform, you need to use Yaw, and for things like the wheels of a car, use Roll or Pitch.
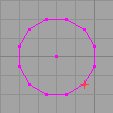
The mover will rotate around its own axis. The location of this axis is determinated by that red vertex that every brush has. For example, the cylinder on the two pictures below will rotate around the red vertex, so the first one will rotate around its center, while the second one will rotate around one of its sides.
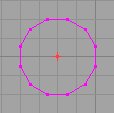
To place the red vertex, click on any purple vertex of the brush and the red one will go to that location, or right click on any place and select Pivot --> Place Pivot (Snapped) Here.
Important is to set the mover's InitialState to None, otherwise the movement of it will be disturbed when players touch it. Expand "Object" in the Mover Properties, and there set InitialState to None. I will talk about InitialState in a minute.
Triggered movers
All movers we made until now were activated by touching it. You can also make movers that are activated by triggers. First of all I will tell you how to make a trigger. Open the Actor Class Browser by selecting "Actor Class Browser..." in the View menu, or by pressing the pawn button  in the toolbar. In there, expand "Triggers" and there select "Trigger". in the toolbar. In there, expand "Triggers" and there select "Trigger".
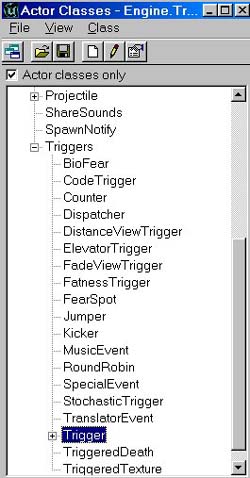
The Actor Class Browser
The trigger will be activated if a players walks in his radius. The trigger will then give an out event that will activate the mover, or anything else. Now place the trigger in your map, at a place where players can walk to activate it.
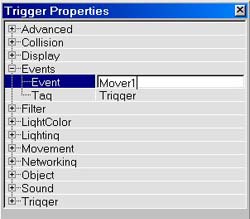
To make this trigger activate a mover, give the trigger an Event and give the mover the same Tag. Open the Trigger Properties and expand "Events". There, type a name under "Event" (Mover1 in my example). Now, open the properties of the mover that will be triggered, there expand "Events" too, and type the same name under "Tag" (Mover1).
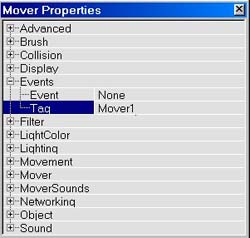
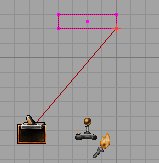
The editor will now paint a red line from the trigger to the mover.
You also have to set the mover to be activated by a trigger, and not by a playerbump. Expand "Object" in the mover properties, and use InitialState for this.
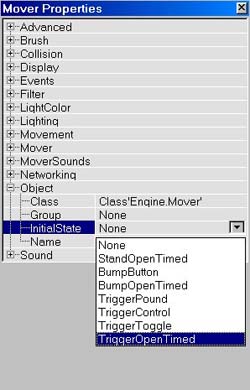
The InitialStates of a mover
-None: the mover will never move through keys, but still can be used as a rotating mover or a mover attached to another one
-StandOpenTimed: Same as BumpOpenTimed
-BumpButton: The same as BumpOpenTimed, but the mover will return immediately
-BumpOpenTimed: the default setting. When you touch (bump) it it will go open, wait a while and then close again
-TriggerPound: This will be explained later
-TriggerControl: as long as the trigger is activated (as long as you are in its radius), the mover will be open. When you are not it the trigger's radius, the mover will be closed
-TriggerToggle: every time you enter the trigger's radius, the mover will toggle between open and closed
-TriggerOpenTimed: every time you enter the trigger's radius, the mover will open, wait a while and then close again
To make the mover work with a trigger, you will have to use one of the trigger settings, such as TriggerOpenTimed or TriggerToggle.
To determinate the radius of the trigger, open its properties and expand collision.
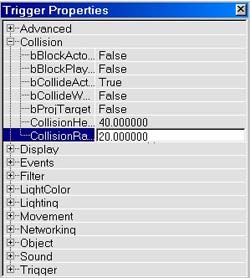
Choosing the radius of a trigger
The radius of the trigger is like a cylinder: use CollisionHeight to determinate the height of it, and use CollisionRadius to determinate the radius. As long as you stand in this cylinder, the mover is activated. If you want to view this cylinder in the 2D views, right click on top of the views, expand "Actor" and there choose "Radii View". You will have to do this.
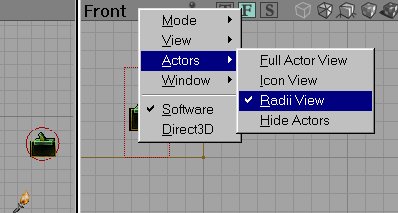
Radii View
There are also some other trigger properties that might be interesting. In the Trigger Properties expand "Trigger"
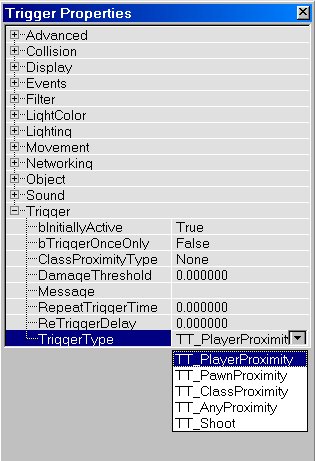
The Trigger Properties
The most important options are:
-bTriggerOnceOnly: If true, the trigger will work only one time, and after that never anymore.
-DamageThreshold: How many damage is at least required when TriggerType is TT_Shoot. The damage of the UT weapons is: (based on what's in the scripts and properties)
enforcer: 17
pulsegun: 72
shockrifle: projectile 55, shot 40, superexplosion 165
enhanced shockrifle: 1000
ripper: razorblade 30, explosive razorblade 34 (?)
biorifle: small glob 20, large glob 75
rocketlauncher: rocket 75, grenade 80
flackcannon: flakshell 70, chunk 16
redeemer: 1000
So a trigger with DamageThreshold = 999 will be activated by the redeemer, but if DamageThreshold = 1001 it will not
-Message: A message that will appear in the textbox of your HUD when you enter the trigger's radius
-RepeatTriggerTime: If the mover has a message, this determinates after how many seconds the message will be repeated as long as you are in the mover's radius. 0 means the message will be displayed only once without being repeated.
-ReTriggerDelay: If this is larger than 0, you will only be able to activate the trigger again after the TriggerDelay time is expired.
-TriggerType: determinates what will activate the trigger:
TT_PlayerProximity: the trigger will be activated if a player is in its radius
TT_PawnProximity: it will be activated when a pawn is in its radius
TT_ClassProximity: it will be activated if the Class you selected in ClassProximityType is in its radius. This might not work.
TT_AnyProximity: it will be activated if a player or a pawn is in its radius
TT_Shoot: it will be activated it you shoot at it, and the damage is larger than what you entered in DamagaThreshold.
Movers & lighting
Movers have several properties that have to do with lighting: expand "Mover" in the Mover Properties.
-bDynamicLightMover: If True, the lighting will be calculated for every place where the mover will be, so if its first in a dark room and goes to a bright one, the mover will become bright as well. Don't use these too much if you want your map to work on slower computers.
-BrushRaytraceKey: If the mover isn't a dynamiclightmover, the lighting on the brush will be calculated for this Mover Keyframe only.
-WorldRaytraceKey: If the mover isn't a dynamiclightmover, the lighting around the mover (for example shadow of it) will be calculated for this Mover Keyframe only.
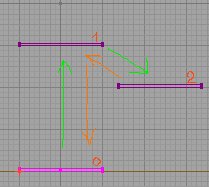
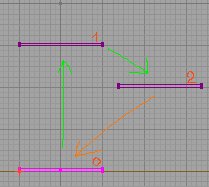
An example of the effect of WorldRaytraceKey is shown on these screenshots. The mover is a lift with two keyframes: Key0 is down, and Key1 is up. Of course this only works when bDynamicLightMover is False
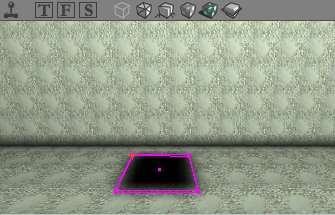
WorldRaytraceKey = 0
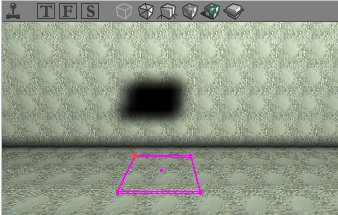
WorldRaytraceKey = 1
The second shadow is calculated as if the mover was at its up position. You can also use this to create fake shadows.
Looping Movers
Looping movers are movers that, once activated, will keep moving forever. There are a lot of ways to make a looping mover, I will explain three of them. Every way has it own advantages, disadvantages and results.
The DualDispatcherMethod (Thanks to Wanderer): This method needs two dispatchers and a trigger. Once you activate the trigger, one of the dispatchers will start a chain-reaction that makes a normal mover toggle between its keyframes.
In your map, first add a normal mover, give it the Keys you want, and open its properties. Set its InitialState (under "Object") to TriggerToggle. Also give it a tag (under "Events"), for example "loopingmover".
Now add two dispatchers (they are in the Actor Class Browser under Triggers).
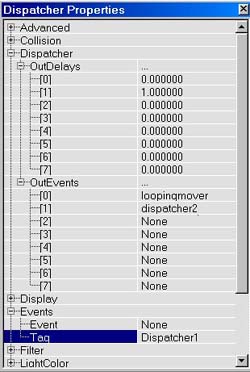
Open the properties of the first one, and expand Events. Give it a Tag, for example "Dispatcher1". Now, expand "Dispatcher" and there expand "OutEvents". Set [0] to the tag of the mover, in this case "loopingmover", and set [1] to "dispatcher2". After that, expand "OutDelays" and set [1] to the time the mover needs to move from its first key to open or close (in seconds). So if the MoveTime of the mover is 2, but it has 4 keys, it will need 6 seconds to move. (not 8 seconds! 4 keys means it has to move from Key0 to Key1, then from Key1 to Key2, and then from Key2 to Key3, which is the last key).
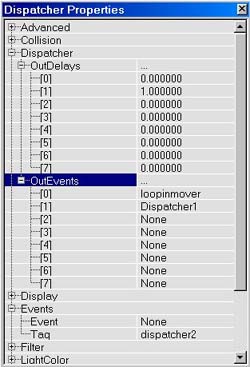
Now do the same for the second dispatcher, but only give this one "dispatcher2" as tag, and set its OutEvent [1] to "dispatcher1".
You now have to do only one more thing: add a trigger somewhere in the map. When you open the map in UT the mover will not yet move, first one of the dispatchers needs to be triggered and after that the mover will keep moving forever. If you want it to appear that the mover was moving already, place the trigger somewhere nearby a startlocation so the player will activate it without even knowing it.
When you placed the trigger, open its properties and set its Event under Events to "dispatcher1" or "dispatcher2", you may choose which one yourself.
The LoopMover:There are different kinds of movers. To get a list of all movers, right click on the Add Mover Brush button instead of left clicking on it. "Mover" is the one we used until now. However, now choose "LoopMover" instead.
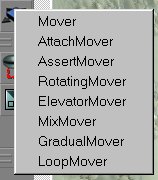
The Mover Classes
After you added it and made its Keys, open the LoopMover Properties. Expand "Object" and then "InitialState". As you can see there is a new propertie there, "LoopMove". This is the only InitialState that makes the LoopMover work. Select it.
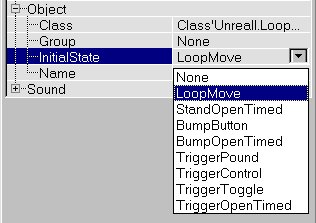
The LoopMove InitialState of the LoopMover
The LoopMover will not move on its own. It will need a trigger. Add a trigger somewhere, give the trigger an Event and the LoopMover the same Tag. If you now play the map, the LoopMover will start moving as long as you are in the radius of the trigger. If you step out of the radius, the mover will stop at the next key it will reach.
If you want the mover to keep moving, even if you are not in the radius of the trigger, it's best to use a TimedTrigger (Thank you, 32_Pistoleta, for pointing me out the NaliRabbit wasn't necessary :)
The TimedTrigger in the Actor Class Browser --> Triggers --> Trigger --> TimedTrigger. Open "TimedTrigger" in it's properties and set bRepeating to True. In DelaySeconds, enter the total time the LoopMover needs for 1 cycle (opening and closing). If you don't do this, this trigger will not work in Tournament-style maps (where you have to press a button before the map starts). Of couse don't forget to set the Event of the trigger to the tag of the LoopMover.
If you experience any problems with the TimedTrigger, or you are using Unreal1, you will need the NaliRabbit anyway. For this, I am making a tutorial: "Activating a trigger with a NaliRabbit"
One final thing you can do is set the LoopMover's MoverEncroachType to ME_IgnoreWhenEncroach, otherwise its movement will stop forever when it hits a player.
If you want to prevent that problem, you can also use the DualDispatcherMethod in combination with a LoopMover. Set OutDelay [1] to the MoveTime of the mover then, instead of the total time it needs to move.
Now, what is the difference between the DualDispatcherMethod and the method with the LoopMover? its in the sequence of the Keys the mover will follow, if there are more than two keys: For example, if the mover has three keys, a normal mover will move from Key0 to Key1 to Key2, then it will go back to Key1 and then back to Key0.
A LoopMover, however, will move from Key0 to Key1 to Key2, and then immidiatly the shortest way back to Key0.
So what method you use depends on how you want your looping mover to move.
TriggerPound:This method uses a particular InitialState of a normal mover: TriggerPound. So when you added your mover and gave it some keys, set its InitialState to this. TriggerPound is somewhat the same as the LoopMove InitialState of the LoopMover, only TriggerPound will use the same key sequence as the DualDispatcherMethod. So to activate the mover you have to do the same as you did with the LoopMover.
The advantage of TriggerPound is that you control 2 different timers: how long the mover will wait at the last key before closing, and how long it will wait at the first key before opening again. In the Mover Properties, expand Mover. To set how long it will wait at the first key, use StayOpenTime. To set how long it will wait at the last key, use OtherTime.
You can represent it like this:
AttachMovers
There is a special AttachMover class, but actually its easier and more reliable to use normal movers if you want an object to move together with a mover.
Make a working normal mover, and give it a Tag, for example "AttachMover". Now add some objects, for example weapons, decorations, lights, etc... in the map. Open the properties of the objects, and expand "Movement". In there, set the AttachTag to the same Tag you gave the mover, in this case "AttachMover". Now expand "Advanced" and make sure that bMovable is True, bNoDelete is False and bStatic is False.
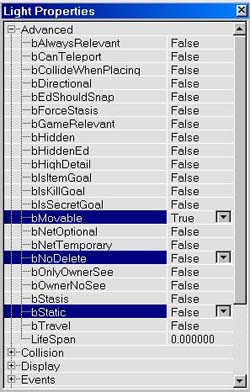
The Properties for a moving object
The object will now always make the same movements as the mover, no matter how far it is away from it, and even if the object has to go through walls.
You can also use the AttachMover class. Right click on the Add Mover button to see it. After you added one, open its properties and expand "AttachMover". There give it an AttachTag. Now, all objects with the same Tag will move together with it.
So, the difference between using normal movers, and using AttachMovers, is that with the normal mover, you need to give the objects an AttachTag, and the mover the same Tag, and with AttachMovers, you have to give the objects a Tag and the AttachMover the same AttachTag.
Attaching movers to another mover
It is possible to attach another mover to a mover, just the same way as you attach an object to it. This way, you can make movers that have more states than only open or closed. If you have a mover (A) that is attached to another one (B), mover A will move if it is activated by bumping or a trigger, but it will also move if mover B moves. If mover B moves in a different way than mover A, mover A is able to move through two different paths: its own one, and the one of mover B.
Of course you need to hide mover B somewhere in your map, players want to see mover A only!
If you want the mover to be attached to more movers, you will have to create a chain: mover A attached to mover B, and at the same time mover B attached to mover C.
There are some problems with this: when a mover is attached to another one, and also has it's own keys, the following scenario might happen: Mover A moves to the left. Then Mover B moves up, and Mover A will follow Mover B and also go up. Now mover A is up and to the left. If Mover A now wants to move to the right again, it will move to the Key that represents the right position, so it will automaticly down again, even if Mover B stays up. If now Mover B moves down, Mover A will also move even more down, so it will disappear in the floor!
One of the main things you can do when attaching a mover to another mover, is make a lift with inner doors. So the doors will descend and raise together with the lift.
Rotations might not work, however I have seen it working sometimes.
If you start using this, you will see that attaching movers to other movers has great potential, you can do amazing things with it without having to script!
Mover events
There are several events a mover can give when something happens with it.
The first kind of event, is when something or someone bumps it. Under "Mover" in the Mover Properties are two settings: BumpEvent and PlayerBumpEvent. BumpEvent will be activated everytime a player or an object bumps the mover, and PlayerBumpEvent will be activated only when a player bumps it.
The second kind of event is the same event you use for triggers: its under "Events" in the Mover Properties. When you enter the name of an event in Event, that event will be called when the mover has reached its last keypoint. This way you can for example make a button that is a small mover that moves into the wall, and as soon as its there a door opens. You don't have to use any trigger for this.
Some types of movers, such as the GradualMover and the AssertMover can give a different event for every Key they reach. I'll handle this later.
The ElevatorMover
One of my favourite mover classes is the ElevatorMover. That's because this mover gives you control over each key. For example if it has 4 keys, you can place 4 ElevatorTriggers in the map: one to go to Key0, one for Key1, one for Key2 and one for Key3.
To add an ElevatorMover, right click on the add mover button and choose ElevatorMover. Now give it 4 different keys.
Open the properties of the ElevatorMover, expand Object and set InitialState to "ElevatorTriggerGradual". After this expand Events and set the tag to "ElevatorMover".
The ElevatorMover does not work with normal triggers. You need to use ElevatorTriggers. These have some specific properties, that a normal trigger hasn't got. You can find the ElevatorTrigger in the Actor Class Browser under Triggers.
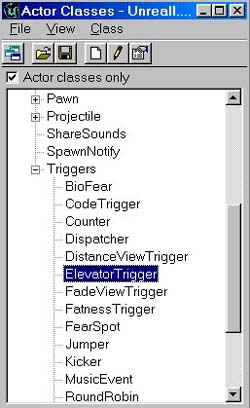
The ElevatorTrigger
Add four of these triggers in your map (one for each key), and open their properties. Under "Events", set their Event to "ElevatorMover". You now should see red lines going from the triggers to the mover.
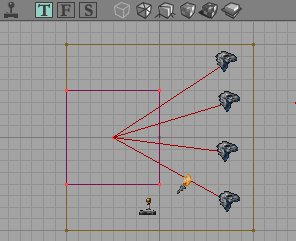
4 ElevatorTriggers, one for each Key of the mover
After this, select one of the ElevatorTriggers, open its properties and expand "ElevatorTrigger".
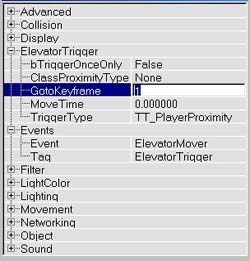
The ElevatorTrigger Properties
It has the following properties:
-bTriggerOnceOnly: the trigger will work only once, and then it will never work anymore.
-ClassProximityType: used together with TT_ClassProximity. Go to the section "Triggered Movers" for this.
-GotoKeyFrame: this is the setting that makes the ElevatorTrigger unique: when you activate an ElevatorTrigger, it will not only give the command to the mover to start moving, but it will also tell the mover to which key it has to move, and that key do you control by using this setting.
-MoveTime: if it is larger that 0, this should determinate the speed of the ElevatorMover, but I have never seen this work. If you get it to work, please contact me.
-TriggerType: What will activate the trigger. Go to the section "Triggered Movers" for this.
Set "GotoKeyFrame" for each of the 4 triggers to respectively 0,1,2 and 3.
If you now play this map, and you walk in the radius of one of the triggers, the mover will go to the Key that you selected in GotoKeyFrame of the trigger, and stop there. It does not matter where the mover starts, it will always reach the correct keyframe!
This kind of mover is called "ElevatorMover", but it can be used for other things as well, of course. Anything that needs multiple fixed positions will need one. A good example is a train with a button on each stop position of it to call the train. Also if you want to make a mover with only two Keys, but a separate trigger for each key, you need to use this.
The sounds of the ElevatorMover don't work as supposed; never use looping sounds for this mover, or they will stay playing forever.
There is also another bug: when the elevator is encroached, it will stop and never listen to any of the buttons again. The only solution is to set MoverEncroachType to ME_IgnoreWhenEncroach.
The AssertMover
This mover will keep opening as long as you are in the trigger's radius. When you step out, it will wait at the first keyframe it reaches on its path, and then return. This means the longer you are in the trigger's radius, the more the mover will open, providing it has more than 2 keys.
To add one, right click on the Add Mover button and select AssertMover. Give it more than 2 keys, for example 4. Set its InitialState to "AssertTriggerOpenTimed". Give it a Tag, for example "AssertMover", and add a trigger with the same Event.
Then expand "AssertMover" in its properties, and use the following parameters:
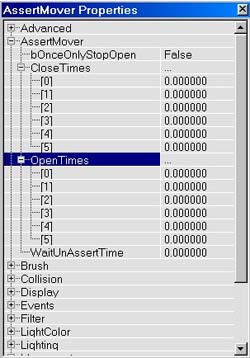
The AssertMover Properties
-bOnceOnlyStopOpen: if this is True, the mover will stay at its last keyframe forever once it has reached it.
-CloseTimes: The normal mover has only one MoveTime setting, that determinates the movespeed between every two keyframes. But the AssertMover has a separate setting for each keyframe. CloseTime[0] is the time the mover needs to close from Key1 to Key0, CloseTime[1] is the time it needs to close from Key2 to Key1, etc... Never forget to use these instead of the MoveTime setting. If you leave these at 0, your mover will move unrealistically fast.
-OpenTimes: OpenTime[0] is the time it needs to open from Key0 to Key1, OpenTime[1] is the time it needs to open from Key1 to Key2, etc...
Too bad, Close- and OpenTimes will only work when the InitialState is "AssertTriggerOpenTimed". If you use any of the other InitialStates, the MoveTime will be used. If you really want a bumpmover to have different Close- and OpenTimes, you can simulate one by attaching the trigger to the mover (see section AttachMovers for this).
-WaitUnAssertTime: this is the time the mover will wait before returning when you left the trigger's radius.
The GradualMover
The GradualMover changes its Tag at every keyframe. So it its at Key0 it will listen to another trigger than when its at Key1. You can also set an Event for each key, so the mover will call another Event everytime it reached one of its keys. Add one and open its GradualProperties.
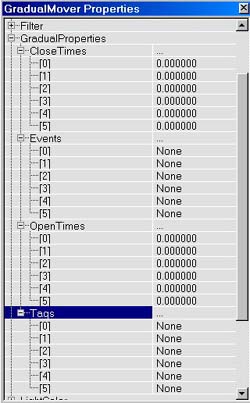
The GradualMover Properties
-CloseTimes: this is the same as the CloseTimes of the AssertMover
-Events: the events the mover will call for its first 6 keys. You can use this for example to open a different door everytime the GradualMover is at another floor.
-OpenTimes: this is the same as the OpenTimes of the AssertMover
-Tags: the tags of the mover for its first 6 keys. If Tag[0] is "A" and Tag[1] is "B", and the mover is at Key0, the mover will move if it receives an event "A", but not if it receives an event "B". If its at Key1, it will only by activated by event "B" and not by event "A".
If you go to its InitialState propertie in Object, you will note that there are 3 new InitialStates:
-GradualTriggerToggle: when activated by the trigger for Tag[0] the mover will go to the last keyframe, and return to the first keyframe when triggered again by that same trigger. The mover does not stop at the middle keyframes, and you can't use the different tags, only Tag[0] will be used. The different Events work, of course.
-GradualTriggerPound: this makes the mover go a little weird. When I tested it looked most like this: when you enter the trigger's radius for the first time, it will open and then close. When you leave the radius it will open and close again. But when you enter the trigger again, it will suddenly act like a GradualTriggerOpenTimed mover, which is described below. The trigger I mentioned was Trigger0 of the example below.
-GradualTriggerOpenTimed: this is the only InitialState that fully uses the different tags. If the mover is closed, and if Tag[0] is "A", Tag[1] is "B" and Tag[2] is "C", and the corresponding triggers have the same events, Trigger0 will make the mover go to Key1. It will wait there forever, until you activate Trigger1. Then the mover will go to Key2. This is the last key in this example, so now the mover will wait for StayOpenTime and then go back to Key0. If you use 6 different keys, you will have a mover that will only reach its last key after you activated 5 triggers in the correct order (the last key doesn't need a trigger). Plus you can use the different Events of the mover to activate other things.
ReturnGroup
Quite important, but not known by a lot of people, is the ReturnGroup setting for movers. It is used to divide movers with the same Tag into subgroups.
If you encroach a mover (= block its path), it will stop or return (or crush or ignore you, but that's not important in this section), depending on its MoverEncroachType. If you have different several movers with the same Tag, and you encroach one of them, the other movers will stop or return as well! If you don't want this to happen, the only thing you have to do is give each mover a different ReturnGroup. Now your two movers have still the same Tag (activated by the same trigger etc...), but will not return or stop together when encroached.
Warning: when you add movers, no matter how many, the Tag of all of them will be by default "Mover", this means all movers have the same Tag if you don't give them another one yourself. If you ever had doors acting strange when encroaching an elevator in your map, and wondered why, this is the reason. To avoid this give them different Tags or give them different ReturnGroups.
Some mover classes, like the GradualMover will also return or stop together if they have different Tags. You always have to give them different ReturnGroups if you don't want this. If you have made a puzzle using gradualmovers, the puzzle can be ruined if you don't give them a different ReturnGroup!
If you have normal movers with different Tags but the same ReturnGroup, they will also stop or return together.
More Mover Properties
This lists all the mover properties that weren't explained yet in the other sections.

-bDamageTriggered: the mover will be triggered if it gets the damage amount defined by DamageThreshold. This only works if the InitialState of the mover is TriggerOpenTimed or TriggerToggle. For a list of the damage of the UT weapons, and more about InitialState, go to the section Triggered Movers.
-bSlave: makes the mover brush a slave of another mover with the same Tag. This is another way to attach movers to each other, and the effect is the same as if you would use the AttachTag of a mover.
-bUseTriggered: this was supposed to activate the mover when a player pushed a key on the keyboard, like the use key in HalfLife. This was left away in the final version of Unreal.
-DamageThreshold: The amount of damage the mover needs to get to be opened when it is bDamageTriggered.
NOTE: You are now ready to move on to PART THREE. You can find it in the ADVANCED SECTION of this site. Or you may choose to download the entire tutorial from Lode's site.
[ Click here for printable version ]
|